Have you ever used a statemachine generator ? Maybe you’ve heard of complicated products like Rational Rose Technical (formerly known as Rational Rose Realtime) where the whole software is turned into active objects passing messages between state machines. There you write code into the model that will be executed when a state transition occurs. Code and model form a unit. Well, using such a powerful approach is really benefitial.
But …
Often this is too much overkill for a project. In that case it is not necessary to relinquish the concept of a generated state machine.
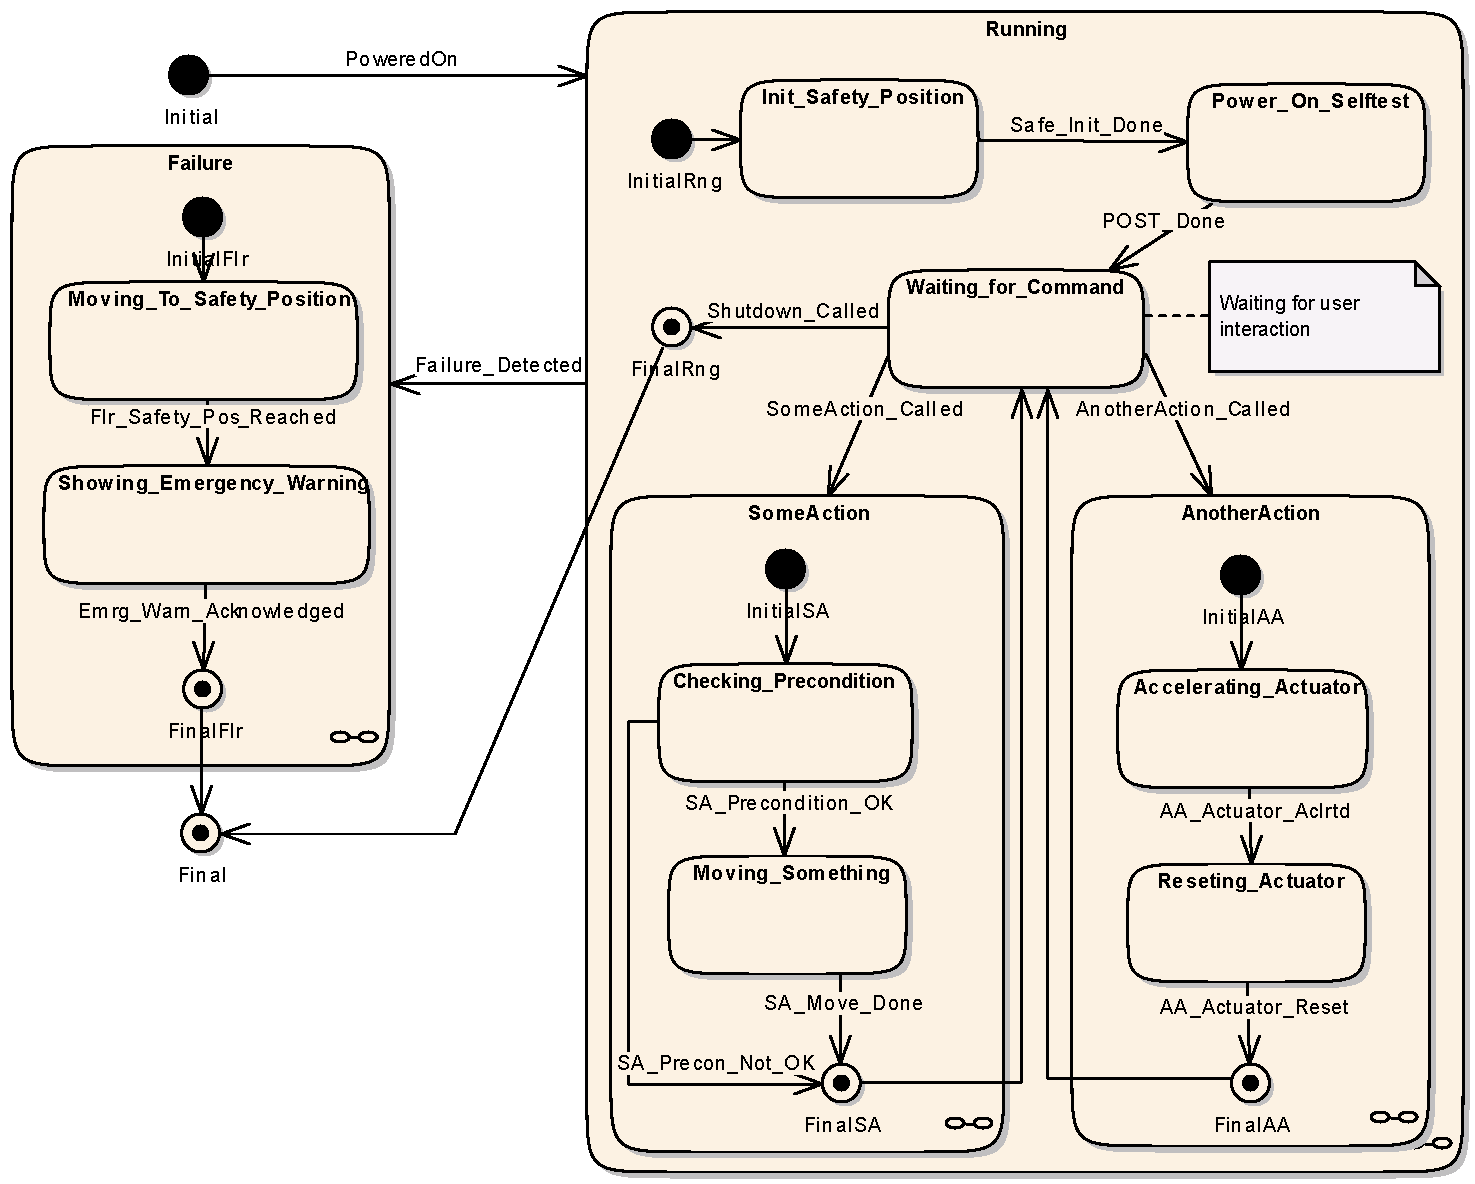
Let’s look at an example state machine. Most embedded devices that are safety critical and have some actuators and operation modes can be modeled this way. The rectangular boxes are states off course. The lines between the states are state transitions. The text near a state-transition is the event-name that moves the state-machine from one state to another.
In a project some years ago when I was a freelancer, I made good experience by using a simple state machine generator without injecting state-transition-code. Instead we used the state machine generator as a decoupled helper instance and we used only two methods:
- stateMachine.SendEvent( <event-enum> );
- stateMachine.IsInState( <state-enum> );
void UI::UserPressedButton()
{
	if(!stateMachine.IsInState(Waiting_For_Command))
	{
		piezo.PlayErrorSound();
		return;
	}

	stateMachine.SendEvent(SomeAction_Called);

	//process button;
	someAction.Execute();
}
That’s all. We only call IsInState() and SendEvent() on an object instance called stateMachine, nothing more, that’s the whole trick.
In other words we ask the statemachine about it’s state before we’re doing something that is allowed only in some certain states. And furthermore we send events to trigger state transitions, to change the current state. (I left out the error handling of SendEvent here for a better readability).
Consequently methods like SomeAction::Execute() are also secured by a state machine sanity check:
SomeAction::Execute()
{
    if(!stateMachine.IsInState(Checking_Precondition))
    {
        // this is a serious internal error, handle it ...
    }

    checkPreconditions();
    stateMachine.SendEvent(SA_Precondition_OK);

    moveActuator();
    stateMachine.SendEvent(SA_Move_Done);
}
As you see this is a very straightforward and lean method that gives a temendous amount of safety and robustness to your system. It cannot happen anymore that the system executes stuff it isn’t allowed to in the current state because just typing if (stateMachine.IsInState()) is a sufficient protection.
The good news is that the code of the stateMachine object that offers the SendEvent() and IsInState() methods can easily be generated. We used SinelaboreRT to generate it directly from Enterprise Architect (it also has it’s own editor if you have no UML tool). It’s inexpensive (only 99$ some years ago) and has even a state machine simulator. There you can send events to the machine and see what it does (which actually did save me from one conceptional bug). It also offers sanity checking of your state machine.
The concept of using this kind of decoupled, lean generated statemachine code really saved our ass in an application where the user interaction came over network (Soap) commands. The Soap commands were issued by a Windows PC and the Windows programmers were unaware of Embedded or safety critical programming style and were continuously firing Soap commands at wrong times. We just used code like follows to perfectly secure the safety critical embedded system from the misplaced Soap calls of the Windows UI programmers:
void Soap::Process_Cmd_SomeAction()
{
    if(!stateMachine.IsInState(Waiting_For_Command))
    {
        Respond_Invalid_Soap_Cmd();
        return;
    }

    stateMachine.SendEvent(SomeAction_Called);

    someAction.Execute();
}

void Soap::Process_Cmd_AnotherAction()
{
    if(!stateMachine.IsInState(Waiting_For_Command))
    {
        Respond_Invalid_Soap_Cmd();
        return;
    }

    stateMachine.SendEvent(AnotherAction_Called);

    anotherAction.Execute();
}

void Soap::Process_Cmd_PowerOffSystem()
{
    if(!stateMachine.IsInState(Waiting_For_Command))
    {
        Respond_Invalid_Soap_Cmd();
        return;
    }

    stateMachine.SendEvent(Shutdown_Called);

    systemController.PowerOff();
}
Soap commands can also be processed in states different from Waiting_For_Command. For example a FailureStop command could be allowed in all states below the ‘Running’ state. Now you might notice that this is a hierarchical state machine. Have a look in the state machine diagram where the transition named Failure_Deteced is located …
void Soap::Process_Cmd_FailureStop()
{
    if(!stateMachine.IsInState(Failure))
    {
        //Ignore if we're allready in the Failure state
        return;
    }

    stateMachine.SendEvent(Failure_Detected);

    failureHandler.Execute();
}
Another example could be a Soap command that is only allowed in the Moving_Something state. E.g. a command to abort the movement.
void Soap::Process_Cmd_AbortMovement()
{
    if(!stateMachine.IsInState(Moving_Something))
    {
        Respond_Invalid_Soap_Cmd();
        return;
    }

    actuator.stopMoving();

    stateMachine.SendEvent(SA_Move_Done);
}
You got the point, right ? This is really straight forward, easy, lightweight and because the state machine itself is generated from UML you have to write very little code (initially and also when the statemachine changes – and in an agile project it will change – often).