Android is one of the prominent operating systems. This operating system provides developers the quick TTM (Time-To-Market). These platforms can accommodate changing requirements of the business. It has the potential to deploy multiple platforms.
This operating system has earned lots of prominence since its launch in 2003. And has enhanced as one of the greatest platforms for mobile app development. The latest release is Version 12 – “TBA”. It was announced on February 18, 2021.
Android SDK and Android Studio
Android Studio was introduced by Google. It was specifically designed to make the development of Android apps seamless.
Using this tool, one can test the app directly from their device or from the emulator. There are numerous languages for Android app development. But here we will just talk about Kotlin.
- XML: This language defines the resources and structures
- Groovy: Good resource to develop the scripts
- Kotlin: They are source codes
This innovative tool comes with the software development kit which is termed Android SDK. It is incorporated with libraries and files. They are employed to develop Android apps and tools such as ADB bridge and virtual device manager.
Android Studio Features
There are numerous features of Android Studio that can help you to develop Android apps using Kotlin.
- Google Play Instant Android Studio is an innovative tool. This will help you to develop apps for those users who do not care about downloads. The feature named “Try Now” is a demo version. This will encourage the user to install the app once they try it.
- Visual Layout Editor will allow you to quickly develop the layouts. This is for screens. You have to drag the widgets and UI components into this editor. Hence, you can develop the layout without employing XML.
- Fast Emulator can be a great help for the simulation of the screens. Hence, you can test the app without any physical device. One can shift the position of the physical device. You can also simulate text messages, phone calls, etc.
Next, let us understand Kotlin.
Kotlin: An interoperable, safe, and concise programming language
It is a precisely typed language of programs for Android and JVM. This is supported officially by Google for Android. This language is an alternative to Java. It combines functional and object-oriented features of programming.
Kotlin was introduced by JetBrains. It has definitely added spark among groovy developers.
Why?
Well, this language can implement the builder. These builders can easily be type-checked. It can also be a great support for delegated properties. Thus, can be utilized to implement for the properties such as:
- Delegated
- Lazy
- Observable
- Vetoable
- Mapped
Take a glimpse below to understand how this programming language’s code looks like:
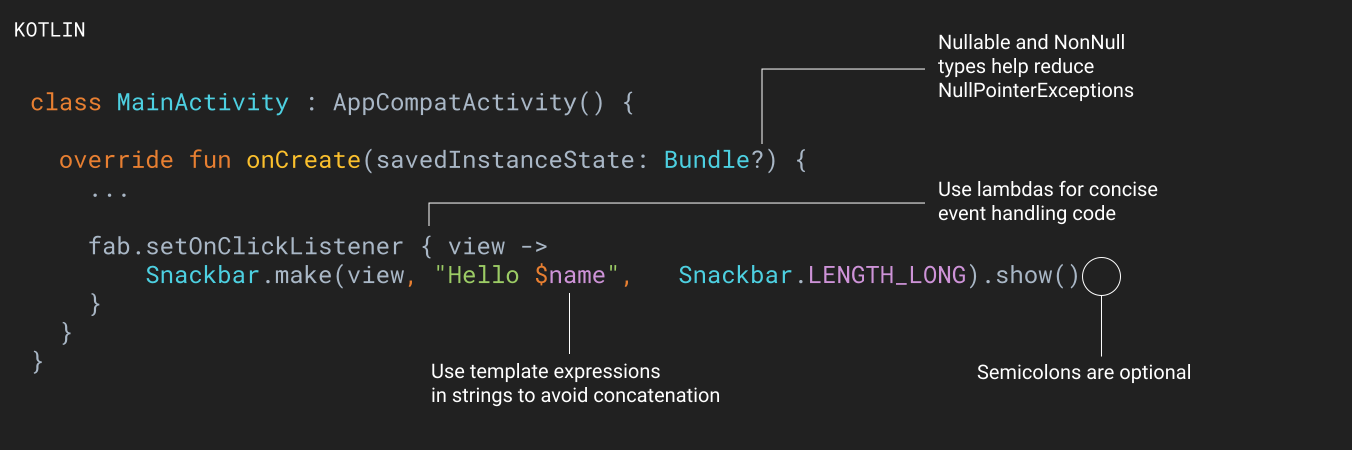
Now, let us check some of the excellent resources of Kotlin.
Benefits of using Kotlin for Android app development
1. Great readability and support
You do not have to spend much time writing codes. They are very easy to learn. It also supports numerous multiplatform. And is widely used in iOS app development.
2. Mature environment
Since its inception, this language has continuously evolved. It will not just only support the whole language but the entire ecosystem. It has scalable tooling.
Kotlin is integrated seamlessly in Android Studio. It is used widely by numerous A-listers.
3. Support to libraries
This language is highly supported by Android Jetpack. The features of Kotlin are implemented in the KTX extension. These include lambdas, extension functions, coroutines, etc.
4. Java Interoperability
You do not have to migrate all the code of Java to Kotlin.
5. Safety coding
You can develop Android apps with less code with Kotlin. Hence, you can attain better readability. This means you will hardly come across any errors. The compiler of Kotlin can easily detect the error. Therefore, you can make a safe code.
How to develop an Android App with Kotlin?
Step 1: Installing the technologies and tools for the development of Android apps
Initially, you must create development environments. This will keep your desktop ready. It will support your goals for the development of the Android operating system. For this, you must require Android SDK and Android Studio.
Android Studio is an Integrated Development Environment. This was crucially an interface where you can simply tap the code. This is primarily known as Kotlin or Java. You can access the various tools which are essential tools essential for innovation.
Android Studio will assist you to access APIs and libraries from the Android SDK. It will allow you to approach the native functionalities of operating systems.
For example, Unity is a robust tool for game development.
Step 2: Start the development
This process is straightforward as one mistake can impact the whole development.
First tap to File > New > New Project.
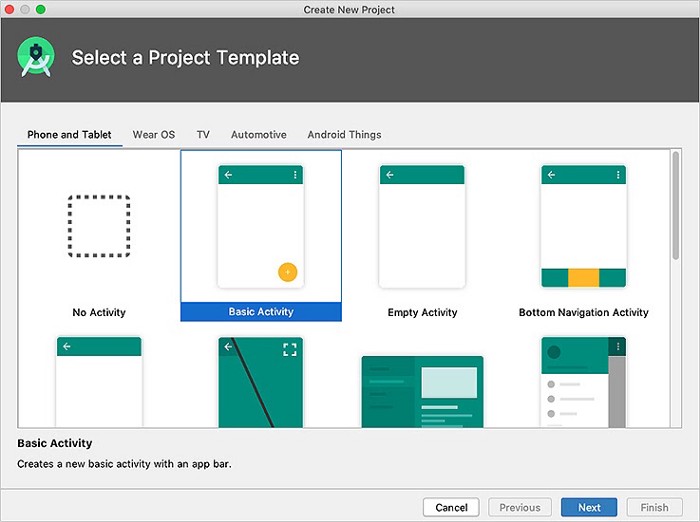
You will be prompted to choose the “Project Template”. It will define the UI elements and code. These will be incorporated into your app while it loads.
If you come across “Activity”. It is referring to the “screen” of the app.
Note:
On the other hand, if you come across “No Activity”. It means you are completely empty and only have a basic file structure.
“Basic Activity” will develop the initiating screen of the app. It will also add a hamburger menu and button. These elements are common in Android apps. Hence, you do not have to invest much time to construct this section.
Step 3: Enlighten to the files
It’s true that it is a daunting task. But here is what you must keep a check on:

The file will open in MainActivity.kt. It is the file with the main logic. It is best and will define the behavior of your app.
For this check at the left side of the screen. You will come across “MyApplication”. Then click app > src > main > kt > com > companyname > myapplication.
This folder is very much essential for the development of Android apps. On the main page, you will notice some code. They are termed as “boilerplate code”.
Next, you can introduce the layout files and other folders and files. (A proficient Android app developer can add necessary elements quickly and smoothly.
The major advantage of using Kotlin is you need less boilerplate.
Step 4: Testing the app
You must always develop an app that states “Hello World”. Check the controls at the top of the screen. You will see a play arrow in green color. On the left side, you will come across a drop-down menu. You can see the name of the phone displayed here.
In the initial step, along with Android Studio, Virtual Device Manager, and the image of the Android system were also installed.
Now by clicking the arrow (mentioned above), you can launch and test the app. You can also adjust the settings such as the version, screen size, font, space, etc.
For this, you can go to Tools and then click AVD Manager.
Make sure you change the message from “Hello World!” to “Howdy World!”
You can also add interactive elements for your creation.
How?
Intimidating, Isn’t it?
They will have experience in developing and working with codes. Therefore, they can overcome and fix the challenges way more quickly.
In a nutshell!!
We have enlightened you with just the basics. There is more in the development end. When opting for Kotlin for Android app development, it is essential to know about the fundamentals.